August 01, 2009

FM Transmitter

This project provides the schematic and the parts list needed to construct a 3V FM Transmitter. This FM transmitter is about the simplest and most basic transmitter to build and have a useful transmitting range. It is surprisingly powerful despite its small component count and 3V operating voltage. It will easily penetrate over three floors of an apartment building and go over 300 meters in the open air.

It may be tuned anywhere in the FM band. Or it may be tuned outside the commercial M band for greater privacy. (Of course this means you must modify your to be able to receive the transmission or have a broad-band FM receiver.) The output power of this FM transmitter is below the legal limits of many countries (eg, USA and Australia). However, some countries may ban ALL wireless transmissions without a licence. It is the responsibility of the constructor to check the legal requirements for the operation of this kit and to obey them.


FM TRANSMITTER CIRCUIT DESCRIPTION


The circuit is basically a radio frequency (RF) oscillator that operates around 100 MHz. Audio picked up and amplified by the electret microphone is fed into the stage built around the first transistor. Output from the collector is fed into the base of the second transistor where it modulates the resonant frequency of the tank circuit (the 5 turn coil and the trimcap) by varying the junction capacitance of the transistor. Junction capacitance is a function of the potential difference applied to the base of the transistor. The tank circuit is connected in a Colpitts oscillator circuit.


The electret microphone: an electret is a permanently charged dielectric. It is made by heating a ceramic material, placing it in a magnetic field then allowing it to cool while still in the magnetic field. It is the electrostatic equivalent of a permanent magnet. In the electret microphone a slice of this material is used as part of the dielectric of a capacitor in which the diaphram of the microphone formsone plate. Sound pressure moves one of its plates. The movement of the plate changes the capacitance. The electret capacitor is connected to an FET . These microphones are small, have excellent sensitivity, a wide frequency response and a very low cost.

First amplification stage: this is a standard self-biasing common emitter amplifier. The 22nF capacitor isolates the microphone from the base voltage of the transistor and only allows alternating current (AC) signals to pass.

The tank (LC) circuit: every FM transmitter needs an oscillator to generate the radio Frequency (RF) carrier waves. The tank (LC) circuit, the BC547 and the feedback 5pF capacitor are the oscillator in the Cadre. An input signal is not needed to sustain the oscillation. The feedback signal makes the base-emitter current of the transistor vary at the resonant frequency. This causes the emitter-collector current to vary at the same frequency. This signal fed to the aerial and radiated as radio waves. The 27pF coupling capacitor on the aerial is to minimise the effect of the aerial capacitance on the LC circuit. The name 'tank' circuit comes from the ability of the LC circuit to store energy for oscillations. In a pure LC circuit (one with no resistance) energy cannot be lost. (In an AC network only the resistive elements will dissipate electrical energy. The purely reactive elements, the C and the L simply store energy to be returned to the system later.) Note that the tank circuit does not oscillate just by having a DC potential put across it. Positive feedback must be provided. (Look up Hartley and Colpitts oscillators in a reference book for more details.)

ASSEMBLY INSTRUCTION

Components may be added to the PCB in any order. Note that the electret microphone should be inserted with the pin connected to the metal case connected to the negative rail (that is, to the ground or zero voltage side of the circuit). The coil should be about 3mm in diameter and 5 turns. The wire is tinned copper wire, 0.61 mm in diameter. After the coil in soldered into place spread the coils apart about 0.5 to 1mm so that they are not touching. (The spacing in not critical since tuning of the Tx will be done by the trim capacitor. It is quite possible, but not as convenient, to use a fixed value capacitor in place of the trimcapacitor - say 47pF - and to vary the Tx frequency by simply adjusting the spacing of the coils. That is by varying L of the LC circuit rather than C.) Adding and removing the batteries acts as a switch.Connect a half or quarter wavelength antenna (length of wire) to the aerial point. At an FM frequency of 100 MHz these lengths are 150 cm and 75 cm respectively.


CIRCUIT CALIBRATION

Place the transmitter about 10 feet from a FM radio. Set the radio to somewhere about 89 - 90 MHz. Walk back to the FM transmitter and turn it on. Spread the winding of the coil apart by approximately 1mm from each other. No coil winding should be touching another winding. Use a small screw driver to tune the trim cap. Remove the screwdriver from the trim screw after every adjustment so the LC circuit is not affected by stray capicitance. Or use a plastic screwdriver. If you have difficulty finding the transmitting frequency then have a second person tune up and down the FM dial after every adjustment. One full turn of the trim cap will cover its full range of capacitance from 6pF to 45pF. The normal FM band tunes in over about one tenth of the full range of the tuning cap.

So it is best to adjust it in steps of 5 to 10 degrees at each turn. So tuning takes a little patience but is not difficult. The reason that there must be at least 10 ft. separation between the radio and the FM transmitter is that the FM transmitter emits harmonics; it does not only emit on one frequency but on several different frequencies close to each other. You should have little difficulty in finding the Tx frequency when you follow this procedure.


LEARNING EXPERIENCE

It should already be clear from the above circuit description that there is a surprising amount of electronics which may be learnt from this deceptively simple kit. Here is a list of some advanced topics in electronics which can be demonstrated or have their beginnings in this project:

Class C amplifiers; FM transmission; antennas; positive and negative feedback; stray capacitance; crystal-locked oscillators; signal attenuation The simple halfwave antenna used in the project is not the most efficient. Greater efficiency may be gained by connecting a dipole antenna using 50 ohm coaxial . Connect one lead to the Antenna point and the other to the earth line.

You may experiment using 6V or 9V with the circuit to see how this increases the range of the transmitter. The sensitivity may be increased by lowering the 22K to 10K. Try it and see. Note that this FM transmitter is not suitable for use on your body, for example, in your pocket. This is because it is affected by external capacitance and the transmitting frequency drifts depending how close you are to it. Stray capacitance is automatically incorporated into the capacitance of the tank circuit which will shift the transmitting frequency.


FM TRANSMITTER PARTS LIST

Remote Control IR Transmitter

Program IR Transmitter

This project is based on integrated circuit from Holtek HT6221/HT6222. Similar parts used to be produced by NEC Semiconductor uPD6121/uPD6122. These ICs are commonly used in VCR infra red remote controls, garage door controllers, car door controllers, security systems and other remote control .

They are capable of encoding 16-bit address codes and 8-bit data codes. Each address/data input can be set to one of the two logic states, 0 and 1. The HT6221 can have keys up to 32(K1~K32) and HT6222 64 keys (K1~K64). When one of the keys is triggered, the programmed address/data is transmitted together with the header bits via an IR (38kHz carrier) transmission medium.

This project provides the transmitter part of the remote control. Designers and hobbyists will have to do their own at the receiver board. Those who are familiar with microcontroller will find this device easy to use. The features of this IC are:

Operating voltage: 1.8V to 3.5V DC
Data output with
38kHz carrier for IR medium
Low standby current
455kHz ceramic resonator or crystal
16-bit address codes
8-bit data codes
Pulse Position Modulation code method

Program Remote Control Circuit Description

Program Remote Control Circuit Description

The typical 32 pins HT6221 schematic is as shown above. However, the values of 1k ohm and 47 ohm at the output pin 5 of the IC can be reduced to increase the distance the IR signal is transmitted. After the transmission codes are sent, the DOUT pin generates transmission codes with a carrier, and the LED goes low to drive a transmission indicator.

When one of the keys is triggered for over 36ms, the oscillator is enabled and the chip is activated. If the key is pressed and held for 108ms or less, the 108ms transmission codes are enabled and comprised of a header code (9ms), an off code (4.5ms), low byte address codes (9ms-18ms), high byte address codes (9ms-18ms), 8-bit data codes (9ms-18ms), and the inverse codes of the 8-bit data codes (9ms-18ms).

After the pressed key is held for 108ms, if the key is still held down, the transmission codes turn out to be a composition of header (9ms) and off codes (2.5ms) only.

Logic 0 is represented by timing 1.12ms and logic 1 by timing 2.24ms using pulse position modulation method as shown below.


The address code and data codes are set using the diodes 1N4148 and resistors 51K ohm and whether D7 is connected to Vcc or Ground.

Automatic Headlight Brightness Switch

Automatic Headlight Brightness Switch

Driving the highway with your high-beam headlights can really increase your visibility, but can he a blinding hazard for other drivers. This simple circuit can be wired into your headlight switch to provide automatic switching between high and low beam headlights when there is oncoming traffic. It does this by sensing the lights of that traffic. In this way, you can drive safely with your high-beams on without blinding other drivers.

Parts

Part

Total Qty.

Description

R1

1

5K 1/4W Resistor

R2, R3, R4

3

5K Pot

Q1

1

NPN Photo transistor

Q2

1

2N3906 PNP Transistor

K1

1

Low Current 12V SPST Relay

K2

1

High Current 12V SPDT Relay

S1

1

SPST Switch

B1

1

Car Battery

MISC

1

Case, wire, board, knobs for pots


Construction

1. Q1 should me mounted in such a way so it points toward the front of the car with a clear line of site. Suitable places are on the dashboard, in the front grill, etc.

2. Adjust all the pots for proper response by testing on a deserted road.

3. S1 enables and disables the circuit.

4. B1 is, obviously, in the car already.

5. Before you try to connect this circuit, get a wiring diagram for your car. Some auto manufacturers do weird things with wiring.

6. Connection A goes to the high beam circuit, B goes to the headlight switch common and C connects to the low beam circuit.

Circuit Diagram

July 31, 2009

Small FM Transmitter

Small FM Transmitter

Nothing critical here. To get a bit of tuning out of the coil you could put a 4-40pF trimmer capacitor (optional) parallel over the 1 µH coil, L1.
C1/C4 and C5/C6 are ceramic capacitors, preferably NPO (low noise) types. C2/C3 are electrolytic or can be tantalum types.
The antenna is nothing more than a piece of 12" wire or a piece of piano wire from 6" to 12".

To find the signal on your receiver, make sure there is a signal coming into the microphone, otherwise the circuit won't work. I use an old mechanical alarm clock (you know, with those two large bells on it). I put this clock by the microphone which picks up the loud tick-tick. I'm sure you get the idea... Or you can just lightly tap the microphone while searching for the location of the signal on your receiver.

NOTE : Battery is strictly recommended to reduce the noise.

Parts List
R1,R3 = 100K
R2 = 10K
R4 = 470 ohm
C1,C4 = 470pF
C2,C3 = 4.7µF, 16V, electrolytic
C5,C6 = 4.7pF
C7 = 4-40pF trimmer cap (optional, see text)
L1 = 1µH
Q1,Q2 = 2N2222, NPN transistor
Mic = Microphone
B1 = 9 Volt, Alkaline battery


Circuit Diagram


NOTE : Click the image for better quality

July 26, 2009

Transformer

In real this is how an TRANSFORMER looks like..
the transformer is a device that transfers electrical energy from one end of the coil to the another coil by mutual induction method......

http://upload.wikimedia.org/wikipedia/commons/7/7a/Transformer-hightolow_smaller.jpg

Introduction of transformer..

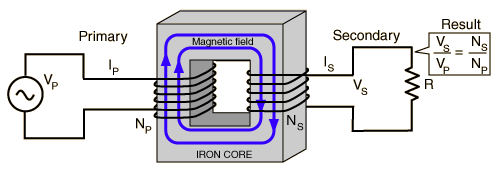
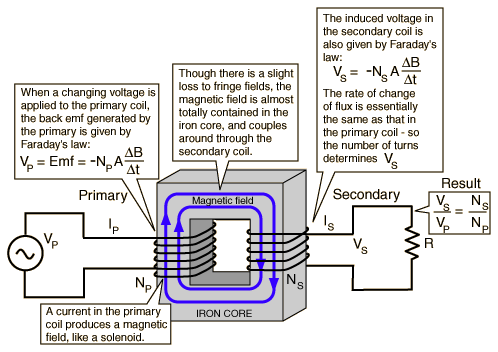
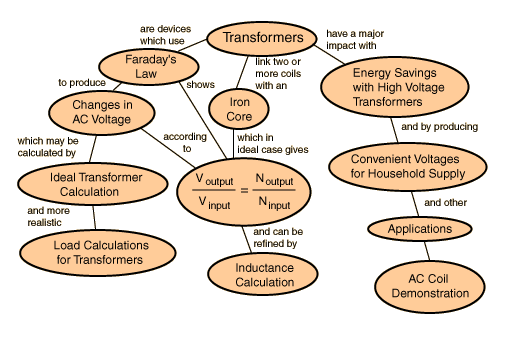
A transformer makes use of Faraday's law and the Ferromagnetic properties of an iron core to efficiently raise or lower AC voltages. It of course cannot increase power so that if the voltage is raised, the current is proportionally lowered and vice versa.

How the ideal transformer looks like


Relation between transformers & Faraday's law..


Formulas for transformers.............


Concepts of transformers...............


Types of transformers...

STEPUP TRANSFORMER:-

http://www.physics.sjsu.edu/becker/physics51/images/32_16_Step-up_transformer.JPG

A "step-up transformer" allows a device that requires a high voltage power supply to operate from a lower voltage source. The transformer takes in the low voltage at a high current and puts out the high voltage at a low current.

STEPDOWN TRANSFORMER:-

http://wpcontent.answers.com/wikipedia/commons/thumb/6/64/Transformer3d_col3.svg/350px-Transformer3d_col3.svg.png

A "step-down transformer" allows a device that requires a low voltage power supply to operate from a higher voltage. The transformer takes in the high voltage at a low current and puts out a low voltage at a high current.

Common Types of Transformer...

Following are the few common types of transformer

Power Transformer - These operate at 50 to 400 Hz at a absolute nominal line voltage from 105 to 130 V. They are actually made with single and multiple secondaries with various step-up and step-down turns ratios.

Secondary Transformer - Secondaries transformer could have a single tap, multiple taps and even sometimes no tap. Some units are prepared with a tapped primary. Output voltage could start ranging from three to several thousand volts with output currents from .01 to 1500 A.

The Cores Transformer - The cores transformers are made up of iron or steel laminations. They are packaged in a hermetically sealed case especially for military or space use or with an open frame or even plastic enclosure for commercial, consumer or any industrial use.

Isolation Transformer - These types of transformer operate with a one-to-one turn’s ratio between primary and secondary, as isolating the line from the secondary load. Usually, an isolation transformer further comprises of Faraday shield, which is in fact a screen of nonmagnetic metal wound between the primary and secondary and then connected to the transformer core.

The Shield Transformer - The shield transformer acts particularly to prevent capacitive coupling of spurious signals and sound between windings, and it as well reduces transformer efficiency by improving leakage current.

Control Transformer - These are used as small power transformer for controlling components like relays and low voltage ac control devices. Common output voltages come in 12 and 24 Vac at current capabilities of 4 to16 A.

Autotransformer - Autotransformers are types of single winding with either fixed or variable step-up or step-down turn’s rations. They are actually smaller and less pricey than the two-winding types.

Audio Transformer - These vary from the power transformer types in, which they are used to give matching electrical characteristics of an output amplifier to that of any normal load speaker. In high-fidelity audio systems, they further operate from 20 Hz to 20 KHz. This audio transformer comprises of voice communications only and operates from 200 to 500 Hz.

Radio Frequency Transformer - These radio frequency transformers operate at a fixed high frequency with a capacitor across primary, secondary or sometimes even both to create a tuned or resounding circuit. Most types normally use an air core; however some are made up of ferrite slug to allow any sort of adjustment for inductance windings over a given range. They are generally assembled in aluminum-shielded container to reduce pickup or radiation of magnetic fields.

Pulse Transformer - These types are used for the generation and transmission of square wave pulses with emphasis on fast rise and fall times of the pulse and high-frequency response. These transformers are packaged in a miniature enclosure, 1/4 inch to 1/2 inch in diameter, and use an air core.


Working of transformer................


Transformer refers to the static electromagnetic setting which can transfer power from one circuit to another one. In AC circuits, AC voltage, current and waveform can be transformed with the help of Transformers. Each transformation is usually to transfer from one circuit to another one by the way of electromagnetism, but it has no direct relation with this circuit. It also can be transformed through electromagnetism (electrical manner). This electromagnetism is known as auto-transformer.
   Transformer plays an important role in electronic equipment. AC and DC voltage in Power supply equipment are almost achieved by transformer’s transformation and commutation. At the same time the electrical parameters transformed by transformer are not one but a few ones.
Most of the isolation, matching and impedance in the circuit carry out by transformer.  Most of isolation, matching and impedance in the circuit carry out by transformer.Simple schematic diagram of the transformer is shown in (1-1). It is connected by closed-magnet (iron cores), two windings and AC power supply. The winding is called the primary winding; another winding is connected with load, and it is called secondary windings.

No-load state of Transformer: viz. the disconnecting state between he secondary winding and load (Figure 1-2). Connect the primary winding and the power supply of AC voltageU1, and then it will produce alternating current I0, this current is called no-load currents. This current set up alternating magnetic flowφ0 which is closed along iron core magnetic circuit. At the same time, it traverses the primary winding and secondary winding, and then produces inducting electromotive forceE2 (secondary no-load voltage).


Circuit symbol for transformers...

circuit symbol Transformer with two windings and iron core.
circuit symbol Step-down or step-up transformer. The symbol shows which winding has more turns, but not usually the exact ratio.
circuit symbol Transformer with three windings. The dots show the relative configuration of the windings.
circuit symbol Transformer with electrostatic screen preventing between the windings.

Doorbell for the Deaf

Doorbell for the Deaf

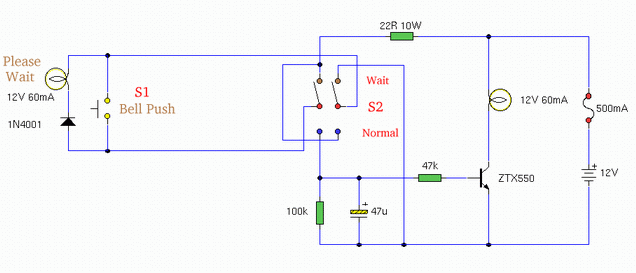
This circuit provides a delayed visual indication when a door bell switch is pressed. In addition, a DPDT switch can be moved from within the house which will light a lamp in the door bell switch. The lamp can illuminate the words "Please Wait" for anyone with walking difficulties.

doorbell circuit


The circuit uses standard 2 wire doorbell cable or loudspeaker wire. In parallel with the doorbell switch, S1, is a 1N4001 diode and a 12 volt 60mA bulb. The bulb is optional, it may be useful for anyone who is slow to answer the door, all you need to do is flick a switch inside the house, and the bulb will illuminate a label saying Please Wait inside the doorbell switch or close to it. The double pole double throw switch sends the doorbell supply to the lamp, the 22 ohm resistor is there to reduce current flow, should the doorbell switch, S1 be pressed while the lamp is on. The resistor needs to be rated 10 watts, the 0.5 Amp fuse protects against short circuits.

When S2 is in the up position (shown as brown contacts), this will illuminate the remote doorbell lamp. When down, (blue contacts) this is the normal position and will illuminate the lamp inside the house. Switch S1 will then charge the 47u capacitor and operate the transistor which lights the lamp. As a door bell switch is only pressed momentarily, then the charge on the capacitor decays slowly, resulting in the lamp being left on for several seconds. If a longer period is needed then the capacitor may be increased in value.

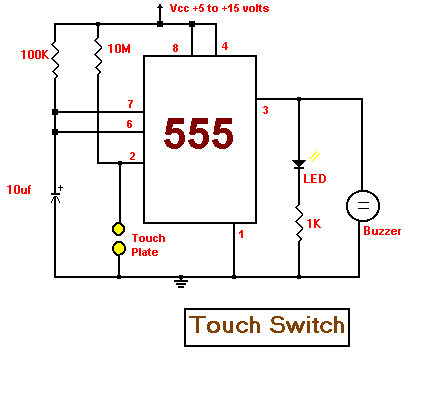
Touch Switch

Touch Switch

This circuit uses a 555 timer as the bases of the touch switch. When the plate is touched the 555 timer is triggered and the output on pin 3 goes high turning on the LED and the buzzer for a certain period of time. The time that the LED and the buzzer is on is based on the values of the capacitor and resistor connected to pin 6 & 7. The 10M resistor on pin 2 causes the the circuit to be very sensitive to the touch.

Circuit Diagram

DOOR BELL FOR DEAF CLICK HERE

Electronics is the study and use of electrical that operate by controlling the flow of electrons or other electrically charged particles in devices such as thermionic valves. and semiconductors. The pure study of such devices is considered as a branch of physics, while the design and construction electronic circuits to solve practical problems is called electronic engineering.

Popular article