July 25, 2009

Geomagnetic field detector

Geomagnetic Field Detector

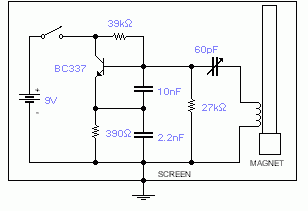
This basic oscillator will detect the Earth magnetic field. The ferrite rod and coil are taken from an old Medium Wave receiver and a small magnet is glued at one end. Tune to a medium wave commercial station until you hear a beat note. Any movement of the ferrite rod will produce an audible note that depends on the prevailing Earth magnetic field. Screening is essential. Use a plastic box padded, on the inside, with copper wires running parallel to the rod and grounded in one place only. A small hole is made in the box in order to adjust the trimmer capacitor with a plastic screwdriver. An American equivalent to the BC337 could be the 2N2369A but I did not try it out.

Circuit Diagram

555 Timer Theory & Design

555 Timer Theory & Design

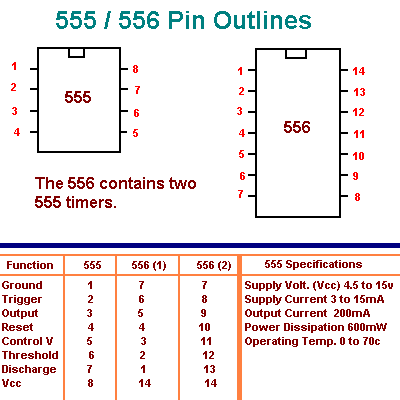
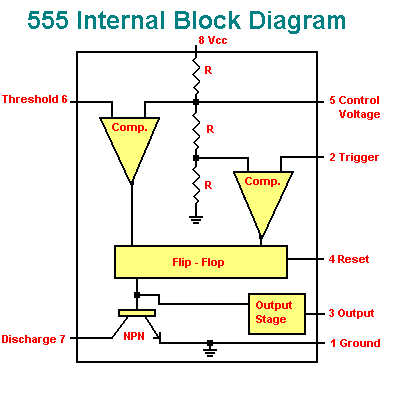
The 555/556 timer is one of the most versatile and popular chips made. It is very inexpensive and easy to use. There are two basic modes of operation. 1: Monostable Mode and 2: Astable Mode. In the monostable mode the 555 acts as a "one - shot". It would be used for the purpose of obtaining a one pulse of variable length. In the astable mode the 555 will re-trigger itself to output a stream of pulses of variable length. Basic information about the timers are shown below.

555/556 Timer info

555/556 Timer info

Monostable Mode

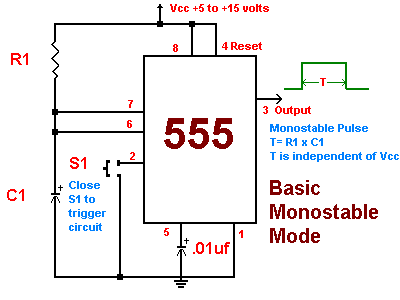
In the basic monostable mode the timer will be triggered by applying a negative pulse to pin 2. That will cause the output of the timer to output a pulse on pin 3 for a time period determined by the values of R1 and C1 in the circuit below. The supply voltage has no effect on the length of the pulse. The formula to determine the duration of the output pulse is as follows T = R1 x C1. For example if R1= 100k ohms and C1= 10uf then the length of the pulse would be 1 second. Typically circuit designers already know what the length of the pulse is going to be, they would then need to calculate the values of R1 and C1. In this case we will have to pick a value for either R1 or C1 and then calculate the value of the other component. To obtain a 10 second timing pulse we will use a 100k ohm resistor for R1 and calculate C1's value. C1 = T / R1. C1 = 100uf. To calculate the value of R1 when the value of C1 is known the formula would be R1 = T / C1.

Monostable Mode

Astable Mode
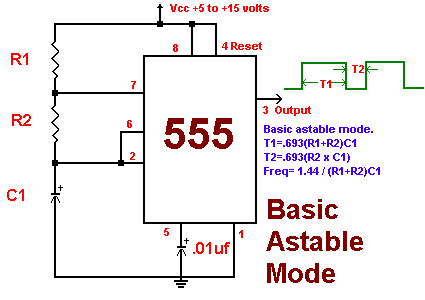
In the astable mode of operation pin 2 and 6 are tied together to cause the timer to re-trigger itself. The output pulse is on pin 3. The output pulse is shown in the diagram below. To calculate the T1 time (output high) use the following formula T1 = .693(R1 + R2)C1. To calculate the T2 time (output low) use the formula T2 = .693( R1 x C1 ). If you need to know the frequency of the output use this formula Freq. = 1.44 / (R1 + 2R2)C1.

Astable Mode" border="1">

Simplest Wireless Headphone

Simplest Wireless Headphone
A basic Infra Red Link for audio communication for distances up to 10 feet.

Working

The transmitter comprises a single amplifying stage driving two series connected IR LEDS. The input source is connected to J1. Please note that the device will pass a small DC current through it and also directly bias the transistor. A suitable device is therefore a high output crystal microphone. These can produce high output voltages up to 1 Volt but this will be reduced by the transistors low input impedance.

The receiver is three stages, the first stage being a photo-transistor. Stages two and three form a high gain darling-ton emitter follower, the bias for the whole stage derived through R2 and the photo-transistor itself. C1 and R3 form a filter to reduce interference from fluorescent lighting and other hum sources. The output is via Jack J2. Note also that the output device will pass a small DC current so a medium impedance loudspeaker or headphones are a good choice here.

Circuit Diagram


NOTE : Click the diagram for better Quality.

Brightness Changing Christmas Star

Brightness Changing Christmas Star

This circuit can be used to construct an attractive Christmas Star. When we switch on this circuit, the brightness of lamp L1 gradually increases. When it reaches the maximum brightness level, the brightness starts decreasing gradually. And when it reaches the minimum brightness level, it again increases automatically. This cycle repeats.

Working

The increase and decrease of brightness of bulb L1 depends on the charging and discharging of capacitor C3. When the output of IC1 is high, capacitor C3 starts discharging and consequently the brightness of lamp L1 decreases. IC2 is an opto-isolator whereas IC1 is configured as an astable multi vibrator. The frequency of IC1 can be changed by varying the value of resistor R2 or the value of capacitor C1. Remember that when you vary the frequency of IC1, you should also vary the values of resistors R3 and R4 correspondingly for better performance. The minimum brightness level of lamp L1 can be changed by adjusting potentiometer VR1. If the brightness of the lamp L1 does not reach a reasonable brightness level, or if the lamp seems to remain in maximum brightness level (watch for a minute), increase the in-circuit resistance of potentiometer VR1. If in-circuit resistance of potentiometer VR1 is too high, the lamp may flicker in its minimum brightness region, or the lamp may remain in ‘off’ state for a long time. In such cases, decrease the resistance of potentiometer VR1 till the brightness of lamp L1 smoothly increases and decreases. When supply voltage varies, you have to adjust potentiometer VR1 as stated above, for proper performance of the circuit. A triac such as BT136 can be used in place of the SCR in this circuit.

Caution: While adjusting potentiometer VR1, care should be taken to avoid electrical shock.

Circuit Diagram

Quick Draw

Quick Draw

A GAME for you Guys..............

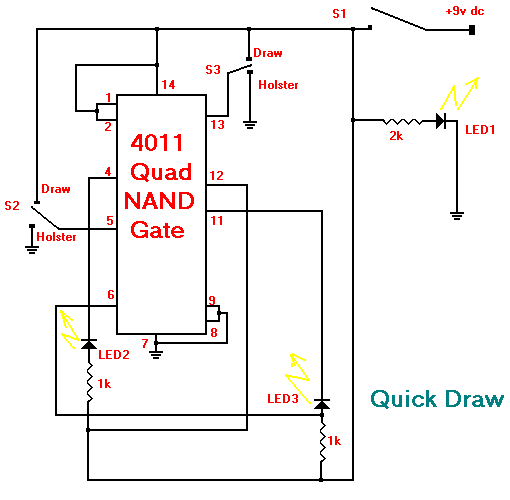
The object of Quick Draw is to test your reaction time against your opponent's. A third person acts as a referee and begins the duel by pressing S1, which lights LED1. Upon seeing LED1 go on, you try to outdraw your opponent by moving S2 from "Holster" position to "Draw" position before your opponent moves S3 from "Holster" to "Draw" position. Who ever gets there first will light the corresponding LED and will automatically prevent the other LED from lighting, clearly indicating a winner.

Circuit Diagram

Quick Draw Circuit

July 24, 2009

FM Jammer

FM Jammer

This device can be very illegal if you attach an external antenna so don't. adjust frequency by turning trimmer. and jams the fm signals within a circumference of 50m.

Circuit Diagram


NOTE : 1.1nH is an alternative for the inductor.

July 23, 2009

TIMER-CUM-CLAP SWITCH

APPLIANCE TIMER-CUM-CLAP SWITCH

When planning for a weekend outing to return late in the evening, we are often in an ambivalence whether to leave the staircase/outside light ‘on’ or ‘off.’ We sometimes miss our favourite TV programme because we forget to switch on the TV in time. If we are in the habit of taking an afternoon nap, we either turn on the mosquito repellent earlier than required or get up being bitten by mosquitoes. The timer-cum-clap switch presented here can solve all these problems and many more. It is a simple circuit that can be programmed to turn on household appliances like lights, fans, TV sets, music systems, etc exactly at a preset time and turn off at
another preset time automatically, thereby saving on electricity. You can turn the appliance ‘on’ or ‘off’ with the clap of your hand, if so desired, without having to touch the unit physically.
The transistor-based timer circuit uses readily available components, is easy to assemble as well as inexpensive, and can be programmed to switch on/off a load from one second to 100 hours in advance. To make the circuit cost-effective as well as simple to construct, a general-purpose
digital clock is incorporated as the basic timing device. The alarm output of the clock is used to toggle the output power supply for switching an appliance ‘on’ or ‘off.’

Construction and Working
Transistors T6 and T7 are configured as a bistable flip-flop that has two stable states. Transistor T7 will be in cut-off mode corresponding to transistor T6 in conduction mode, and vice versa. When transistor T6 conducts, its collector potential is very near to the emitter potential, i.e., ground, and therefore there is no base current to transistors T7 through R6. Thus, transistor T7 is in cut-off state. The collector of T7 is above ground potential and the current flows through resistors R7 and R13 to maintain the base current of T6. Thus, T6 remains in conduction state and T7 in cut-off state indefinitely. Now, if a voltage pulse is applied to the base of transistor T7 from some external source, a momentary base current will trigger it into conduction and its collector potential will come down to near ground potential. Thus, the current flowing through resistor R13 will pass through the collector of T7 and there will be no current through R7, making T6 go into cut-off state and thereby raising the collector potential of T6 to some positive value. This, in turn, will keep T7 conducting. Now the base current of T7 will pass through resistors R14 and R6. This state will sustain until some external voltage is applied to the base of T6.The external voltage pulse (for switching) is taken from two sources: the alarm output of a clock or the sound picked up by condenser microphone ‘M’ after proper amplification by transistors T1, T2 and T3. Since most of the digital clocks give out negative pulses to the buzzer (whose other end is directly connected to the positive terminal of the battery), a reverse diode (D8) and a pnp transistor (T10) are used at this stage. The negative pulses are rectified by D8 and filtered by C9 to supply a steady base current of T10. Otherwise, the output will become noisy because of the pulsating nature of the alarm. (If the clock gives out positive pulses, T10 can be replaced with an npn transistor like BC547. Diode D8 has to be reversed and R18 has to be connected between the base of T10 and ground.) The external voltage pulse is fed at the common emitter of transistors T4 and T5 through capacitor C8. When the alarm starts (sending negative voltage pulses), capacitor C9 discharges through D8 and, at the same time, charges through R19, thus triggering the base current of T10. The emitter current of T10 charges capacitor C8,which passes through the emitter of either T4 or T5 depending on their bias. When T6 is conducting, T4 is forward biased and the voltage pulse is fed at the base of T7, bringing T7 into conduction and T6 into cut-off mode. This makes T5 forward-biased and T4 reverse-biased. The next voltage pulse, either through T10, D1 or D2 corresponding to the clock alarm, clap sound or operation of the reset switch, sends a base current of T6 through the emitter of T5 and the output changes over. When clap switch is not required, S2 can be turned off. S3 is the reset switch (push-to-on type), which is used to toggle the output between ‘on’ and ‘off’ states. R10-C7 and R8-C6 are parallel paths to R7 and R6 for quick switchover of the bistable latch. Two AA-size batteries supply 3V DC to the clock and maintain a positive voltage to the collectors of T6 and T7 through diode D7. This keeps the circuit active during power failures also. A step-down transformer supplies 12V DC to the relay coil and sound amplifier section. Diodes D5 and D6 are rectifier diodes and C5 is the ripple filter capacitor. Diode D4 prevents the 3V battery from draining out into the rest of the circuit. The digital clock is a commonly available digital calendar with at least one alarm setting and one countdown timer setting. The digital calendar, being cheap, keeps the total cost of the project low and allows for precise settings of the alarm times. The alarm can be set 24 hours in advance, while a second alarm can be selected in the countdown timer mode, which allows for setting of the time 100 hours (99:59:59 hours to be precise) in advance. Availability of more than one alarm setting in the clock will give the added advantage of setting multiple switching times. Instead of the digital calendar, any other digital clock or battery-operated quartz clock (with alarm) can also be used as the basic timing device, though the alarm time setting is less precise in case of the latter. Instead of one clock, multiple clocks can be wired by connecting diodes parallel to D8. Note that once set in the clock mode, the alarm operates daily at the same time. But in the countdown mode, it operates only once. So if an appliance is to be turned on and off daily at the same time without human intervention, at least two digital clocks have to be wired (if the clock does not have two alarm settings apart from the countdown timer). Indicator LEDs (fixed on LED sockets) show ‘on’ or ‘off’ condition of the output plug.before fixing the clock on the cabinet, open it carefully to disconnect its piezoelectric buzzer. The terminal that shows pulsating voltage during an alarm operation (detected with a multimeter) is connected to the base of T10 through D8 and R19. The internal battery is replaced and the terminals are connected to the external battery chamber with proper polarity. The operation of the circuit can be divided into two parts: clap mode and timer mode. The timer can be put in clap mode by turning on the clap switch (S2). The connected appliance can now be turned on/off by clapping with an audible intensity. The clock timer will function as usual in this mode. While clapping, leave a gap of a few seconds between two successive claps. Thus, the gadget will show better response because it has been designed to consider two overlapping claps as one, ignoring the second one. For timer mode, switch S2 is turned off. The alarm is set at the time when switchover is required. The second switchover time can be set in the countdown timer. For that, the time difference between the present time and the time at which switching is required is calculated and this time is set in the countdown timer. When setting is done, set the output plug as ‘on’ or ‘off’ (as desired) by pressing reset switch S3. While setting the alarm, ensure a delay of at least three minutes between two successive alarm times (on/off) to allow for the first alarm to subside completely. Otherwise, the unit may malfunction (ignore the second alarm).

Circuit Diagram


NOTE : Click the image for better Quality

July 21, 2009

EFY March 2009

Electronics For You March 2009


Size : 49.6 MB


Click the download button to start
Password : electronicseveryday

SOFTWARES

Free PCB

Free PCB

Free PCB is a free, open-source PCB editor for Microsoft Windows, released under the GNU General Public License. It was designed to be easy to learn and easy to use, yet capable of professional-quality work. It does not have a built-in auto router, but it can use the Free Route web-based auto router at www.freerouting.net. Some of its features are:

  • 1 to 16 copper layers
  • Board size up to 60 inches by 60 inches
  • Uses English or metric units (i.e. mils or mm) for most functions.
  • Footprint libraries courtesy of Ivex Design International Inc.
  • Copper fill areas
  • Footprint Wizard and Footprint Editor for creating or modifying footprints
  • Imports and exports PADS-PCB net lists
  • Exports extended Gerber files (RS274X) and Excellon drill files
  • Design rule checker
  • Auto save

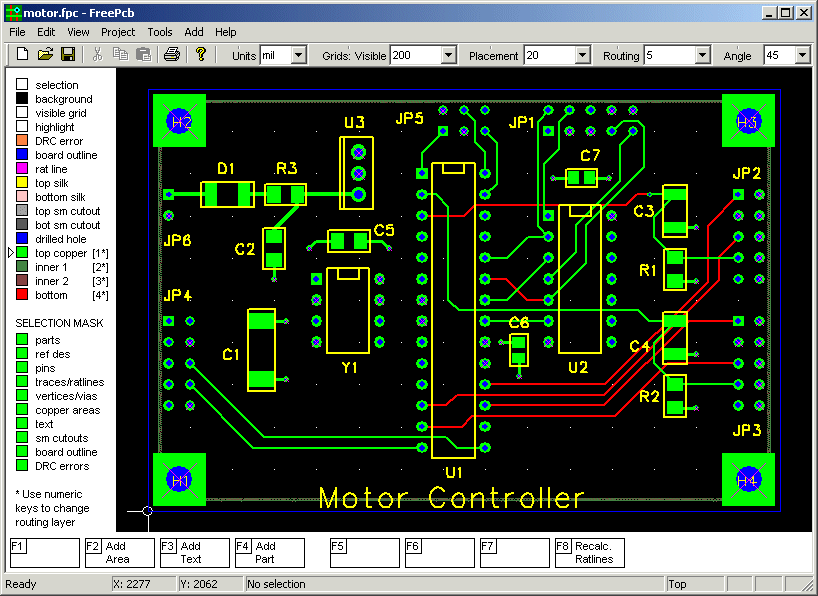
The layout for a small PCB is shown in the screenshot below.


Size : 4.1 MB


Click the download button to start
Password : electronicseveryday

Misc Electronics

Misc Electronics

Functions
  • System
    Preferred componentsSelect component values used in all designs and step size for ctr-n and ctr-m
    Hot keysDefine hot keys for opening pages
  • Miscellaneous
    GeometryHandles: Circles, part of circles, triangles, squares, rectangles, trapezoid
    SoundSound speed and perceived sound levels
    Weather and air%RH, dew point, air pressure and other weather related calculations
    Periodic tableA periodic table with all elements, it has search functions and a few data for each element
    Photo lensSome lens calculations
    Photo lightSome light calculations
  • Calculations
    CalculatorCan do all the usual stuff, including mathematics.
    Tiny CalcCan do the same as the entry line in Calculator, but is very small when pulled out.
    Curve fitFits a curve to a collection of data points
    Ohms lawOhms law, impedance of capacitor and inductors, complex power
    Ohms law 3 phaseOhms law with complex power for 3 phase systems
    dBDecibel and neper, both power and voltage including volt/watt for a reference level
    Charge curveCapacitor/inductor charge/discharge with resistive, current and power loads (not all combinations supported)
    WaveformsCalculates RMS, mean, PEEK, DC, FFT for different waveforms.
  • Mechanical
    WiresCalculates resistance and power loss in wires, can also do conversion between USA and European units.
    Cable calculationsCalculate frequence response of a cable
    Fan coolingCalculates how big a fan to get rid of some power.
    Heat sinkCalculates junction temperature for specified power level and heat sink
    Printed circuit boardCalculate micro strip, strip line, track resistance and current
    Cable calculationsSimulate cables at low (audio) frequences
  • Components
    Capacitor designCalculate capacitance of different geometries
    Color codesConvert between color codes and numeric values for many types of components.
    ThermosensorsCalculates for PT100, NTC and all types of thermocouples
    Air coilAnalyze or design an air core inductor
    LedsColor/wavelength of leds and design of circuits to drive leds from DC or AC.
    Components type numbersTries to decode component codes
    Power MOSTurn on/off time and power loss estimation
  • MPU
    MPU TimersCalculates divide factors for up to five software timers
    Integer mathConverts real numbers to fractions, calculates primes and other integer stuff
    Serial communicationTiming and curves, use full when programming software uart's and IR rx/tx.
    CRC and check sumCalculate crc, check sum and modulus for data blocks, can also analyze a data block for what check sum/crc was used
  • Simple Circuit
    FoCalculates Fo for RC, RL, RLC circuits
    Series/parallelCalculate/design series/parallel connection of resistors, capacitors and inductors
    Charge timeCharge/discharge time for simple circuits (including 555).
    Voltage dividerDesign/analyze voltage dividers, can include component tolerance and load.
    Two portConversion between different types of two ports.
  • Circuit
    1. order filtersAnalyze and design 32 different filter configurations
    Attenuator networkDesign different kind of attenuators
    Power SupplyAnalyze and design power supplies with 78xx and LM317 style regulators

Screen Shots


Size : 1.0 MB


Click the download button to start
Password : electronicseveryday

July 20, 2009

Elektor March 2004

Elektor March 2004


Size : 20.6 MB


Click the download button to start
Password : electronicseveryday

Elektor February 2004

Elektor February 2004


Size : 40.4 MB


Click the download button to start
Password : electronicseveryday

Elektor January 2004

Elektor January 2004


Size : 44.0 MB


Click the download button to start
Password : electronicseveryday

EFY Project Ideas

Project Ideas Collection

July 19, 2009

EFY Project Ideas 2001

EFY Project Ideas 2001
This has a complete collection of the project ideas in the Electronics For You magazine in the year 2001.


Size : 13.0 MB


Click the download button to start
Password : electronicseveryday

EFY Project Ideas 2000

EFY Project Ideas 2000

This has a complete collection of the project ideas in the Electronics For You magazine in the year 2000.

Size : 12.3 MB


Click the download button to start
Password : electronicseveryday

DOOR BELL FOR DEAF CLICK HERE

Electronics is the study and use of electrical that operate by controlling the flow of electrons or other electrically charged particles in devices such as thermionic valves. and semiconductors. The pure study of such devices is considered as a branch of physics, while the design and construction electronic circuits to solve practical problems is called electronic engineering.

Popular article