July 04, 2009

LONG RANGE FM TRANSMITTER

Long range FM transmitter

http://www.electronic-circuits-diagrams.com/radioimages/1.gif

The power output of most of these circuits are very low because no power amplifier stages were incorporated.
The transmitter circuit described here has an extra RF power amplifier stage, after the oscillator stage, to raise the power output to 200-250 milliwatts. With a good matching 50-ohm ground plane antenna or multi-element Yagi antenna, this transmitter can provide reasonably good signal strength up to a distance of about 2 kilometres.
The circuit built around transistor T1 (BF494) is a basic low-power variable-frequency VHF oscillator. A varicap diode circuit is included to change the frequency of the transmitter and to provide frequency modulation by audio signals. The output of the oscillator is about 50 milliwatts. Transistor T2 (2N3866) forms a VHF-class A power amplifier. It boosts the oscillator signals’ power four to five times. Thus, 200-250 milliwatts of power is generated at the collector of transistor T2.
For better results, assemble the circuit on a good-quality glass epoxy board and house the transmitter inside an aluminium case. Shield the oscillator stage using an aluminium sheet.
Coil winding details are given below:
L1 - 4 turns of 20 SWG wire close wound over 8mm diameter plastic former.
L2 - 2 turns of 24 SWG wire near top end of L1.
(Note: No core (i.e. air core) is used for the above coils)
L3 - 7 turns of 24 SWG wire close wound with 4mm diameter air core.
L4 - 7 turns of 24 SWG wire-wound on a ferrite bead (as choke)
Potentiometer VR1 is used to vary the fundamental frequency whereas potentiometer VR2 is used as power control. For hum-free operation, operate the transmitter on a 12V rechargeable battery pack of 10 x 1.2-volt Ni-Cd cells. Transistor T2 must be mounted on a heat sink. Do not switch on the transmitter without a matching antenna. Adjust both trimmers (VC1 and VC2) for maximum transmission power. Adjust potentiometer VR1 to set the fundamental frequency near 100 MHz.
This transmitter should only be used for educational purposes. Regular transmission using such a transmitter without a licence is illegal in India

July 02, 2009

Light-sensitive Alarm

INTRODUCTION

The circuit detects a sudden shadow falling on the light-sensor and sounds the bleeper when this happens. The circuit will not respond to gradual changes in brightness to avoid false alarms. The bleeper sounds for only a short time to prevent the battery running flat. Normal lighting can be used, but the circuit will work best if a beam of light is arranged to fall on the light-sensor. Breaking this beam will then cause the bleeper to sound. The light sensor is an LDR (light-dependant resistor), this has a low resistance in bright light and a high resistance in dim light.

  • The light-sensitivity of the circuit can be adjusted by varying the 100k preset.
  • The length of bleep can be varied from 0.5 to 10 seconds using the 1M preset.
Using the 7555 low-power timer ensures that the circuit draws very little current (about 0.5mA) except for the short times when the bleeper is sounding (this uses about 7mA). If the circuit is switched on continuously an alkaline PP3 9V battery should last about a month, but for longer life (about 6 months) you can use a pack of 6 AA alkaline batteries.

Parts Required

  • resistors: 10k, 47k, 1M ×3
  • presets: 100k, 1M
  • capacitors: 0.01µF, 0.1µF, 10µF 25V radial
  • transistor: BC108 (or equivalent)
  • 7555 low-power timer IC
  • 8-pin DIL socket for IC
  • LDR (light-dependant resistor) type ORP12
  • bleeper 9-12V
  • on/off switch
  • battery clip for 9V PP3
  • stripboard 12 rows × 25 holes

Stripboard Layout


Stripboard layout for light-sensitive alarm


Circuit diagram

Circuit diagram for light-sensitive alarm

Tester

INTRODUCTION

this is responsible for testing components
as well as checking circuit board tracks, wires and connections for continuity (conduction). It tries to pass a small current through the item being tested and the LED will light brightly, dimly or not at all according to the resistance of the item:
  • LED bright means the resistance is low, less than about 1kohm
  • LED dim means the resistance is medium, a few kohm
  • LED off means the resistance is high, more than about 10kohm
When not in use the 9V PP3 battery should be unclipped or the crocodile clips attached to a piece of card or plastic to prevent them touching. You could add an on-off switch in the red wire from the battery clip and this may be the best option if you mount the simple tester in a box.

Parts Required


If you think this project is too simple to be useful, please see the table of components which it can be used to test and think again!
  • resistor: 390ohm
  • red LED 5mm diameter, standard type
  • battery clip for 9V PP3
  • crocodile clips: miniature red and black
  • stripboard: 5 rows × 7 holes

Stripboard Layout


Stripboard layout for simple tester

Testing stripboard, PCB tracks, wires and connections


Circuit diagram for simple tester
Circuit diagram
Connect a crocodile clip on each side of the suspected fault:
  • LED bright means there is a connection.
  • LED off means there is no connection.
If you are testing a stripboard or PCB which has components soldered in place, beware of possible connections via the components and allow for this when interpreting the results.

Stripboard circuits can suffer from two common problems: solder bridging between adjacent tracks making a connection where there should be none, and tracks broken with a track cutter which have an almost invisible thread of copper conducting across the break.

If a PCB has etched poorly the tracks may be very thin in places or there may be traces of copper bridging between adjacent tracks.

Wires and connections may be checked for continuity (conduction).

Testing components

Connect a crocodile clip on each side of the component. They can be connected either way round unless stated otherwise in the table below.
Component Test results for a component in good condition
Resistor LED bright for low resistance, less than about 1kohm.
LED dim for medium resistance, a few kohm.
LED off for high resistance, more than about 10kohm.
Variable Resistor Across the two ends of the track the LED brightness will depend on the resistance value (see above).
Between one end of the track and the wiper you should see the LED brightness vary as you adjust the variable resistor. However, for high resistances (>10kohm) the LED will only light near one end of the track.
Diode

Diode anode (a) and cathode (k)

LED bright with red lead to anode and black lead to cathode (stripe).
LED off with black lead to anode and red lead to cathode (stripe).

a = anode, k = cathode (the end with a stripe)

Zener Diode

Zener diode anode (a) and cathode (k)

LED bright with red lead to anode and black lead to cathode (stripe).
LED dim with black lead to anode and red lead to cathode (stripe) if the zener diode voltage is less than about 7V.
LED off with black lead to anode and red lead to cathode (stripe) if the zener diode voltage is greater than about 7V.

a = anode, k = cathode (the end with a stripe)

LED
Light Emitting Diode

LED anode (a) and cathode (k)

LED bright with red lead to anode and black lead to cathode (short lead) - the LED being tested will also light.
LED off with black lead to anode and red lead to cathode (short lead).

a = anode (long lead), k = cathode (short lead, flat on body)

Transistor

NPN and PNP transistor symbols

B = base, C = collector, E = emitter

Please refer to a supplier's
catalogue to identify the leads.

For each pair of transistor leads connect the tester leads first one way, then the other way.

These are the results for an NPN transistor in good condition:
CE pair: LED off both ways.
BC pair: LED bright with red lead on B, LED off the other way.
BE pair: LED bright with red lead on B, LED off the other way.

These are the results for a PNP transistor in good condition:
CE pair: LED off both ways.
BC pair: LED bright with black lead on B, LED off the other way.
BE pair: LED bright with black lead on B, LED off the other way.

Note that you can use the tester to identify the B lead (the one which always conducts one way) and to distinguish NPN and PNP transistors (by the tester lead colour when B conducts). However, the tester cannot distinguish the C and E leads.

Capacitor
less than 1µF
LED off.
Please bear in mind that a broken connection will give the same result.
Capacitor
1µF and greater
If the capacitor is polarised (most will be) connect the red lead to positive (+) and the black lead to negative (-).
The LED will flash briefly when first connected.
Reverse the connections: the LED will give another brief flash.
With low values like 1µF the flash will be almost too brief to see, but larger values such as 100µF will give longer flashes. Electrolytic capacitors may leak a little when connected the wrong way round, making the LED light dimly continuously.
LDR
Light Dependent Resistor
LED bright when the LDR is in bright light.
LED dim when the LDR is in normal room light.
LED off when the LDR is in darkness.
Thermistor LED dim when the thermistor is warm.
LED off when the thermistor is cold.
These are typical results, the exact results depend on the thermistor's resistance.
Lamp LED bright.
Note that the lamp itself will NOT light because the test current is too small.
Switch LED bright when switch contacts are closed (on).
LED off when switch contacts are open (off).
Note that you can use the tester to identify the switch contacts if necessary.
Fuse, Motor, Loudspeaker, Inductor, Relay coil, Wire LED bright.

Simple Electronic Lock

INTRODUCTION

There are six (or more) push switches. To 'unlock' you must press all the correct ones at the same time, but not press any of the cancel switches. Pressing just one cancel switch will prevent the circuit unlocking. When the circuit unlocks it actually just turns on an LED for about one second, but it is intended to be adapted to turn on a relay which could be used to switch on another circuit.

Please Note:This circuit just turns on an LED for about one second when the correct switches are pressed. It does not actually lock or unlock anything!


Parts Required

  • resistors: 470, 100k ×2, 1M
  • capacitors: 0.1µF, 1µF 16V radial
  • red LED
  • 555 timer IC
  • 8-pin DIL socket for IC
  • on/off switch
  • push-switch ×6 (or more)
  • battery clip for 9V PP3
  • stripboard 12 rows × 25 holes

Stripboard Layout


Stripboard layout for simple electronic lock

Circuit diagram

Circuit diagram for simple electronic lock


July 01, 2009

Automatic Headlight Brightness Switch

INTRODuCTION

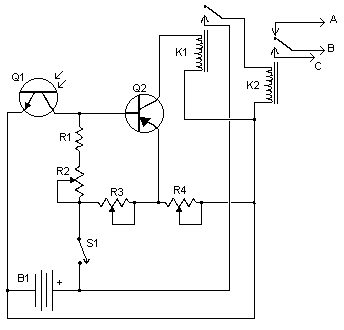
Driving the highway with your high-beam headlights can really increase your visibility, but can be a blinding hazard for other drivers. This simple circuit can be wired into your headlight switch to provide automatic switching between high and low beam headlights when there is oncoming traffic. It does this by sensing the lights of that traffic. In this way, you can drive safely with your high-beams on without blinding other drivers.

circuit diagram:-

Schematic for Automatic Headlight Brightness Switch

Notes

  1. Q1 should me mounted in such a way so it points toward the front of the car with a clear line of site. Suitable places are on the dashboard, in the front grill, etc.
  2. Adjust all the pots for proper response by testing on a deserted road.
  3. S1 enables and disables the circuit.
  4. B1 is, obviously, in the car already.
  5. Before you try to connect this circuit, get a wiring diagram for your car. Some auto manufacturers do weird things with wiring.
  6. Connection A goes to the high beam circuit, B goes to the headlight switch common and C connects to the low beam circuit.
parts required

Part
Total Qty.
Description
Substitutions
R115K 1/4W Resistor
R2, R3, R435K Pot
Q11NPN Phototransistor
Q212N3906 PNP Transistor
K11Low Current 12V SPST Relay
K21High Current 12V SPDT Relay
S11SPST Switch
B11Car Battery
MISC1Case, wire, board, knobs for pots

LED Thermometer

INTRODUCTION

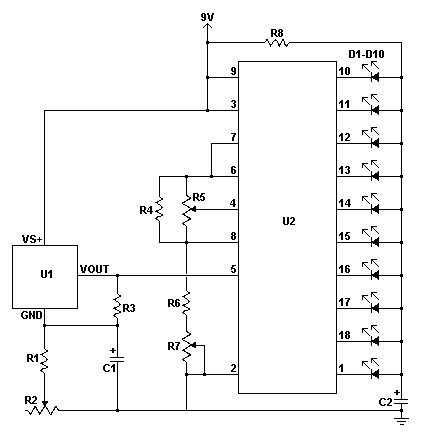
This LED thermometer is designed for in home use, to read temperatures between about 60 and 78 degrees Fahrenheit. It is based around a precision temperature sensor IC, the LM34DZ. This sensor require no calibration and can measure temperatures of between -50F and +300F. While the circuit shown here does not use the full range of that sensor, it can be modified to do so by simply changing the voltage reference to U2 at the sacrifice of precision.

circuit diagram:-

Schematic for remote telephone ringer

Notes

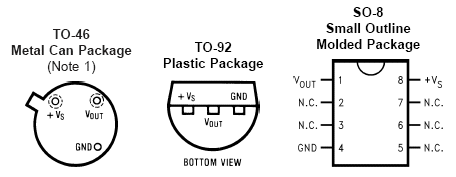
  1. The pinout of U1 depends on the version of the IC you purchase. These options are shown below:

    Pinout of LM34 IC variants

  2. You will want to build the circuit with U1 and U2 in sockets in order to be able to complete calibration (which requires removal of these ICs).
  3. You can use any LED you want for D1 - D10, however blue LEDs have a higher voltage requirement so if you want to go blue for a modern look, they may appear more dim then red, yellow or green.
  4. By leaving pin 9 of U2 disconnected, the graph will operate in dot mode and R8 should be 100 Ohm. If you build the circuit with pin 9 tied to 9V, the circuit will be in graph mode and R8 should be 15 Ohms.
  5. To calibrate the circuit, you will need a voltmeter. Power the circuit up and let it sit for a few minutes for temperature to stabilize. Ground the negative lead of the meter and connect the positive lead to pins 6 and 7 of U2. Set R7 so the meter reads as close to 3.345V as possible. Now connect the positive lead of the meter to pin 4 of U2 and adjust R5 until the meter reads 2.545V. Finally, disconnect power to the circuit and remove U1 and U2 from their sockets. Measure the value of R3 with an ohmmeter and remember that value. Connect the ohmmeter across R1 and adjust R1 to a value of exactly 3 times the value of R3. Reinstall U1 and U2 and the circuit is ready for use.
parts required

Part
Total Qty.
Description
Substitutions
C111uF 25V Electrolytic Capacitor
C2110uF 25V Electrolytic Capacitor
R112.2K 1/4W Resistor
R2, R5, R731K Trim Pot
R311K 1/4W Resistor
R411.5K 1/4W Resistor
R61470 Ohm 1/4W Resistor
R81100 Ohm Or 15 Ohm 1/4W Resistor (See Notes)
D1 - D1010LED
U11LM34DZ Precision Fahrenheit Temperature Sensor
U21LM3914 Bar/Dot Graph Driver IC
MISC1Board, Wire, Socket For U1 and U2, Case

June 30, 2009

Wireless Switch

Wireless Switch
Normally, home appliances are controlled by means of switches, sensors, etc. However, physical contact with switches may be dangerous if there is any shorting. The circuit described here requires no physical contact for operating the appliance. You just need to move your hand between the infrared LED (IR LED1) and the photo transistor (T1).

Working
The infrared rays transmitted by IR LED1 is detected by the photo transistor to activate the circuit. This circuit is very stable and sensitive compared to other AC appliance control circuits. It is simple, compact and cheap. Current consumption is low in milliamperes. The circuit is built around an IC CA3140, IR LED1, photo transistor and other discrete components. When regulated 5V is connected to the circuit, IR LED1 emits infrared rays, which are received by photo transistor T1 if it is properly aligned. The collector of T1
is connected to non-inverting pin 3 of IC1. Inverting pin 2 of IC1 is connected to voltage-divider preset VR1. Using preset VR1 you can vary the reference voltage at pin 2, which also affects sensitivity of the photo transistor. Op-amp IC1 amplifies the signal received from the photo transistor. Resistor R3 controls the base current of transistor BC548 (T2). The high output
of IC1 at pin 6 drives transistor T2 to energise relay RL1 and switch on the appliance, say, hand dryer, through the relay contacts. The working of the circuit is simple. In order to switch on the appliance, you simply interrupt the infrared rays falling on the photo transistor through your hand. During the interruption, the appliance remains on through the relay. When you remove your hand from the infrared beam, the appliance turns off through the relay. connect +5V supply to the circuit.

Circuit Diagram


Click the Diagram for better Quality

Long Range IR Transimmiter

Long Range IR Transimmiter
Most of the IR remotes work reliably within a range of 5 metres The circuit complexity
increases if you design the IR transmitter for reliable operation over a longer range, say, 10 metres. To double the range from 5 metres to 10 metres, you need to increase the transmitted power four times. Here is a simple circuit that will give you a pretty long range. It uses
three infrared transmitting LEDs (IR1 through IR3) in series to increase the radiated power. Further, to increase the directivity and so also the power density, you may assemble the IR LEDs inside the reflector of a torch. For increasing the circuit efficiency, a MOSFET (BS170) has been used, which acts as a switch and thus reduces the power loss that would result if a transistor were used. To avoid any dip during its ‘on’/‘off’ operations, a 100μF reservoir capacitor C2 is used across the battery supply. Its advantage will be more obvious when the
IR transmitter is powered by ordinary batteries. Capacitor C2 supplies extra charge during ‘switching on’ operations. As the MOSFET exhibits large capacitance across gate-source terminals, a special drive arrangement has been made using npn-pnp Darlington pair of
BC547 and BC557 (as emitter followers), to avoid distortion of the gate drive input. Data
(CMOS-compatible) to be transmitted is used for modulating the 38 kHz frequency generated
by CD4047 (IC1). However, in the circuit shown here, tactile switch S1 has been used for modulating and transmitting the IR signal. Use switch S2 for power ‘on’/‘off’ control. commercially available IR receiver modules (e.g., TSOP1738) could be used for efficient reception of the transmitted IR signals.

Circuit Diagram


NOTE : Click the image for better Quality


Pin Configuration

Automatic Emergency Light

AUTOMATIC LOW-POWER EMERGENCY LIGHT
Here is a white-LED-based emergency light
Advantages

1. It is highly bright due to the use of white LED s.
2. The light turns on automatically when mains supply fails, and turns off when mains power resumes.
3. It has its own battery charger.When the battery is fully charged, charging stops automatically.

The circuit comprises two sections charger power supply and LED driver.

The charger power supply section
It is built around 3-terminal adjustable regulator IC LM317 (IC1), while the LED driver section is built around transistor BD140 (T2). In the charger power supply section, input AC mains is stepped down by transformer X1 to deliver 9V, 500 mA to the bridge rectifier, which comprises diodes D1 through D4. Filter capacitor C1 eliminates ripples. Unregulated DC voltage is fed to input pin 3 of IC1 and provides charging current through diode D5 and limiting resistor R16. By adjusting preset VR1, the output voltage can be adjusted to deliver the required charging
current. When the battery gets charged to 6.8V, zener diode ZD1 conducts and charging current from regulator IC1 finds a path through transistor T1 to ground and it stops charging of the battery.

LED Driver section
The LED driver section uses a total of twelve 10mm white LEDs. All the LEDs are connected in parallel with a 100-ohm resistor in series with each. The common-anode junction of all the twelve LEDs is connected to the collector of pnp transistor T2 and the emitter of transistor T2 is directly connected to the positive terminal of 6V battery. The unregulated DC voltage, produced at the cathode junction of diodes D1 and D3, is fed to the base of transistor T2 through a 1-
kilo-ohm resistor. When mains power is available, the base of transistor T2 remains high and
T2 does not conduct. Thus LEDs are off. On the other hand, when mains fails, the base of transistor T2 becomes low and it conducts. This makes all the LEDs (LED1 through LED12) glow.The mains power supply, when available , charges the battery and keeps the LEDs off as
transistor T2 remains cut-off. During mains failure, the charging section stops working and
the battery supply makes the LEDs glow. You can use more LEDs provided the total current consumption does not exceed 1.5A. Driver transistor T2 can deliver up to 1.5A with proper heat-sink arrangement.

Circuit Diagram


NOTE : Click the image for better Quality

Pin Configuration

Drinking Water Alarm

Drinking Water Alarm
The many States supply water for limited duration in a day. Time of water supply is decided by the management and the public does not know the same. In such a situation, this water alarm circuit will save the people from long wait as it will inform them as soon as the water supply starts.

Construction
At the heart of this circuit is a small water sensor. For fabricating this water sensor, you need two foils—an aluminium foil and a plastic foil. You can assemble the sensor by rolling aluminium and plastic foils in the shape of a concentric cylinder. Connect one end of the insulated flexible wire on the aluminium foil and the other end to resistor R2. Now mount this sensor inside the water tap such that water can flow through it uninterrupted. To complete the circuit, connect another wire from the junction of pins 2 and 6 of IC1 to the water pipeline or the water tap
itself.

Working
The working of the circuit is simple. Timer 555 is wired as an astable multivibrator. The multivibrator will work only when water flows through the water tap and completes the circuit
connection. It oscillates at about 1 kHz. The output of the timer at pin 3 is connected to loudspeaker LS1 via capacitor C3. As soon as water starts flowing through the tap, the speaker
starts sounding, which indicates resumption of water supply. It remains ‘on’ until you switch off the circuit with switch S1 or remove the sensor from the tap. The circuit works off a 9V
battery supply. The water sensor is inserted into the water tap. Connect the lead coming out from the junction of 555 pins 2 and 6 to the body of the water tap. Use on/off switch S1
to power the circuit with the 9V PP3 battery.

Circuit Diagram


Click the image for better Quality

June 28, 2009

IR Bug

Infra Red Bug
This circuit can be used to detect the presence of modulated infrared signals in its vicinity from any electronic source, for instance, an IR handheld remote controller. It can also be used for testing IR burglar alarm systems.

Working
Besides the power supply (one 9V PP3/6F22 compact battery
pack), it consists of an infrared signal detector-cum-preamplifier followed by a melody generator
and a tiny audio amplifier. The amplified signal is fed to the melody generator via resistor R5. The output of the melody generator is fed to LM386 low-power audio amplifier (IC2) via variable resistor VR1, which works as the volume control. The loudspeaker sounds to indicate
the presence of IR signal near the circuit. IC LM386 is wired as a minimum-parts amplifier with
a voltage gain of ‘20,’ which is sufficient for this application. Capacitor C3 is used for decoupling of the positive rail and the R-C combination network comprising C4 and R7 bypasses high frequency to ground. The circuit can be easily wired on a general-purpose PCB. Pin configurations of IC LM386, transistor BC547 and melody generator UM66 are shown. principle, converts the IR signal pulse trains into noticeable aural notes. S1 is used to switch on/off mains power and LED1 indicates power ‘on.’ Resistor R4 and zener diode ZD2 form a low-current voltage stabiliser for providing steady 5.1V DC to the small signal preamplifier circuit. IR LED1 is the main sensing element. The IR signal detected by IR LED1 is amplified by npn transistors T1.

Circuit Diagram

Click the image for better QUALITY

Pin Configuration

IR REMOTE

REMOTE CONTROL FOR HOME APPLIANCES
Connect this circuit to any of your home appliances (lamp,fan, radio, etc) to make the appliance turn on/off from a TV, VCD or DVD remote control. The circuit can be activated from up to 10 metres.

Working
The 38kHz infrared (IR) rays generated by the remote control are received by IR receiver module TSOP1738 of the circuit. Pin 1 of TSOP1738 is connected to ground, pin 2 is connected to the power supply through resistor R5 and the output is taken from pin 3. The output signal is amplified by transistor T1 (BC558). The amplified signal is fed to clock pin 14 of decade counter IC CD4017 (IC1). Pin 8 of IC1 is grounded, pin 16 is connected to Vcc and pin 3 is connected to LED1 (red), which glows to indicate that the appliance is ‘off.’ The output of IC1 is taken from its pin 2. LED2 (green) connected to pin 2 is used to indicate the ‘on’ state of the appliance. Transistor T2 (BC548) connected to pin 2 of IC1 drives relay RL1. Diode 1N4007 (D1) acts as a freewheeling diode. The appliance to be controlled is connected between the pole of the relay and neutral terminal of mains. It gets connected to live terminal of AC mains via normally opened (N/O) contact when the relay energizes.

Circuit Diagram


Click the image for better QUALITY


Rheostat

In real this is how an rheostat like..

A rheostat is an electrical component that has an adjustable resistance
http://www.suswox.com/rheostat.jpg

Introduction
:

It is a type of potentiometer that has two terminals instead of three. The two main types of rheostat are the rotary and slider. The symbol for a rheostat is a resistor symbol with an arrow diagonally across it. They are used in many different applications, from light dimmers to the motor controllers in large industrial machines.

Rheostat Construction

http://www.americantackle.us/images/prod/misc/APW_rheostat.jpg
Most rheostats are the wire-wound type that have a long length of conductive wire coiled into a tight spiral. The linear type have a straight coil while the rotary type have the coil curved into a torus to save space. The coil and contacts are sealed inside the case to protect them from dirt which can cause an open circuit, and from moisture which can cause a short circuit. Rheostats can be made from other materials such as carbon disks, metal ribbons, and even certain fluids. As long as a material has a significant resistance change over a short length, it can probably be used to make a rheos.

How They Work

The basic principle used by rheostats is Ohm's law, which states that current is inversely proportional to resistance for a given voltage. This means the current decreases as the resistance increases, or it increases as the resistance decreases. Current enters the rheostat through one of its terminals, flows through the wire coil and contact, and exits through the other terminal. Rheostats do not have polarity and operate the same when the terminals are reversed. Three-terminal potentiometers can be used as rheostats by connecting the unused third terminal to the contact terminal.

Applications

Some light dimmers use rheostats to limit the current passing through the light bulbs in order to change their brightness. The greater the resistance of the rheostat, the lower the brightness of the light bulbs. Some lights cannot use dimmers, such as fluorescents and gas-discharge lamps. These lights have large resistance loads, called ballasts, that maintain a constant current through them. Rheostats have no effect on their brightness and can even damage them.

Motor controller also use rheostats to control the speed of a motor by limiting the flow of current through them. They are used in many small appliances such as blenders, mixers, fans, and power tools. Rheostats are also used as test instruments to provide an accurate resistance value. While rheostats can be used to control electric ovens and cooktops, thermostats are preferred because they have additional parts which automatically adjust the current flow to maintain a constant temperature.

The rheostat is still a common and fundamental electronic component used to control the flow of current in a circuit. However, it has largely been replaced by the triac, a solid-state device also known as a silicon controlled rectifier (SCR). A triac do not waste as much power as a rheostat and has better reliability due to the absence of mechanical parts. Rheostats commonly fail because their contacts become dirty or the coil wire corrodes and breaks.

DOOR BELL FOR DEAF CLICK HERE

Electronics is the study and use of electrical that operate by controlling the flow of electrons or other electrically charged particles in devices such as thermionic valves. and semiconductors. The pure study of such devices is considered as a branch of physics, while the design and construction electronic circuits to solve practical problems is called electronic engineering.

Popular article